
Concrete Patio, Walkway, Drainage & Foundation Waterproofing Project: A Complete Exterior Transformation in Berks County, PA
- Laura Nelson
- 2 days ago
- 6 min read

Updated: 21 hours ago

Project Snapshot
Project Type: Concrete Walkway & Patio Installation, Drainage Improvements, Foundation Waterproofing
Location: Berks County, PA
Problem: The homeowner wanted to improve access around their home with a new patio and walkway while addressing water management concerns around the foundation and protecting the finished basement from future moisture issues.
Solution: Installation of a new colored concrete patio and walkway, downspout drainage improvements, foundation waterproofing, utility relocation, final grading, and careful site protection throughout construction.
The Homeowner's Goal

This project was about much more than pouring concrete.
The homeowners wanted to create a functional and attractive outdoor space that improved access around the house while also addressing long-term water management concerns. Like many homes in Pennsylvania, managing roof runoff and keeping water away from the foundation are just as important as the appearance of the finished project.
Rather than simply installing a new patio and walkway, this project became a complete exterior improvement focused on durability, drainage, and protecting the home's investment for years to come.
What We Found

As we planned the project, several opportunities emerged to improve both the appearance and performance of the property.
The existing layout offered room for a new concrete walkway and patio, but we also identified several additional improvements that would benefit the homeowner long-term:
Roof runoff could be redirected away from the house.
Foundation waterproofing could be completed while excavation equipment was already onsite.
The existing water spigot on the front of the house would be more useful moved to the side instead.
Special care would be needed to avoid damage to the driveway during construction.
By addressing these items together, we could create a finished product that looked great while solving problems hidden beneath the surface.
Step 1: Protecting the Property Before Work Began
One of the first priorities on this project was protecting the homeowner's existing driveway. Concrete trucks are extremely heavy, and even stone delivery trucks can place significant stress on residential driveways.
To minimize risk, we used a pump trailer that allowed the concrete truck to remain safely on the road rather than driving onto the property. Stone was delivered using a smaller dump truck instead of a full-sized tri-axle, and ground protection mats were used to protect vulnerable areas near the driveway edge.
These extra precautions helped ensure the homeowner wouldn't have to spend additional money repairing damage after the project was complete.
Step 2: Preparing the Site & Installing the Base


Every successful concrete project begins long before the concrete arrives.
Proper site preparation is one of the most important factors affecting the lifespan of a patio or walkway. A well-prepared base helps reduce settlement, supports the slab evenly, and improves long-term performance through Pennsylvania's seasonal freeze-thaw cycles.
The area was excavated and prepared to establish proper grades and elevations. A stone base was then installed to provide a stable foundation beneath the concrete.
Wire reinforcement was also incorporated into the slab design to provide additional durability.
Step 3: Redirecting Roof Runoff Underground

One of the most important improvements on this project won't be visible from the surface.
Existing downspouts were rerouted beneath and alongside the new patio using Schedule 35 PVC pipe. Rather than allowing water to discharge directly beside the foundation, roof runoff is now carried underground and discharged toward the edge of the property in the direction of the nearby creek.
This helps:
Reduce water around the foundation
Protect the new patio and walkway
Minimize erosion
Improve overall drainage around the home
Managing water before problems develop is one of the smartest investments a homeowner can make.
Step 4: Foundation Waterproofing for Long-Term Protection


Since excavation equipment was already onsite and access to the foundation was readily available, the homeowners chose to move forward with foundation waterproofing as part of the project.
We excavated along the foundation wall to below footing depth and exposed the existing foundation surface.
Once exposed, the wall was thoroughly pressure washed to remove dirt, debris, and loose material. A fresh layer of foundation waterproofing coating was then applied to create a barrier against moisture infiltration.
After waterproofing was completed, the excavation was backfilled with drainage stone and geotextile fabric near the footing to promote water movement away from the foundation, followed by final restoration with soil.
Combined with the newly rerouted downspouts, this system helps keep groundwater and roof runoff away from the home's finished basement.
Sometimes the most valuable improvements are the ones you'll never see once the project is complete.
Step 5: Installing the Colored Concrete Patio & Walkway
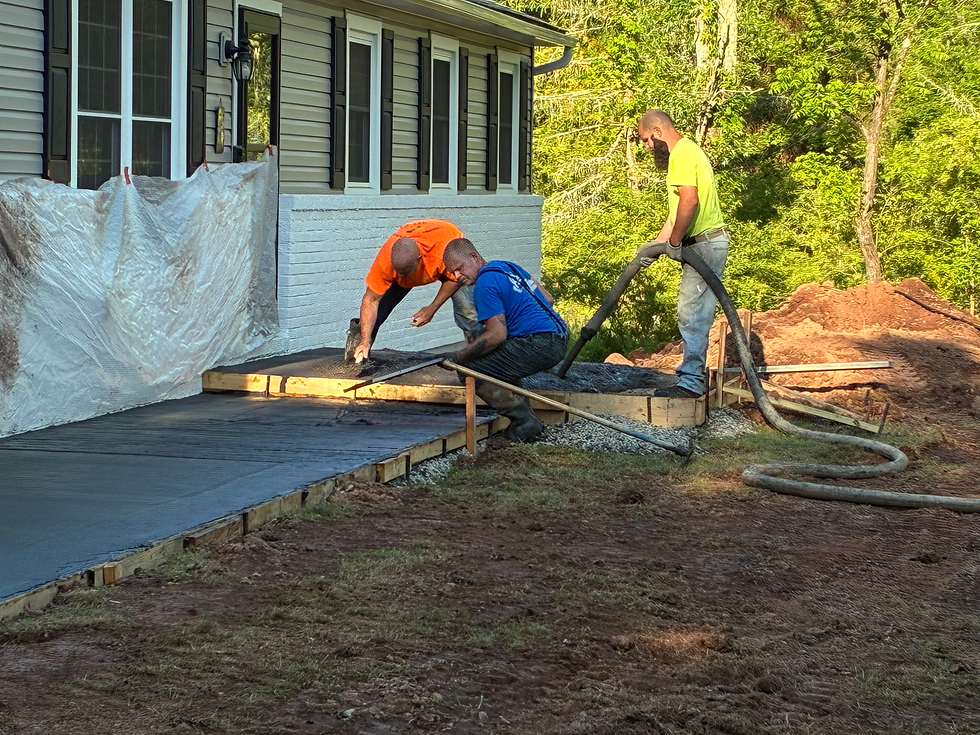

With the drainage and waterproofing work completed, it was time to install the concrete.
This project included:
A 6' x 70.5' concrete walkway
A 9.5' x 9.5' concrete patio
One 6-inch step at the house
An additional step at the curve to accommodate grade changes
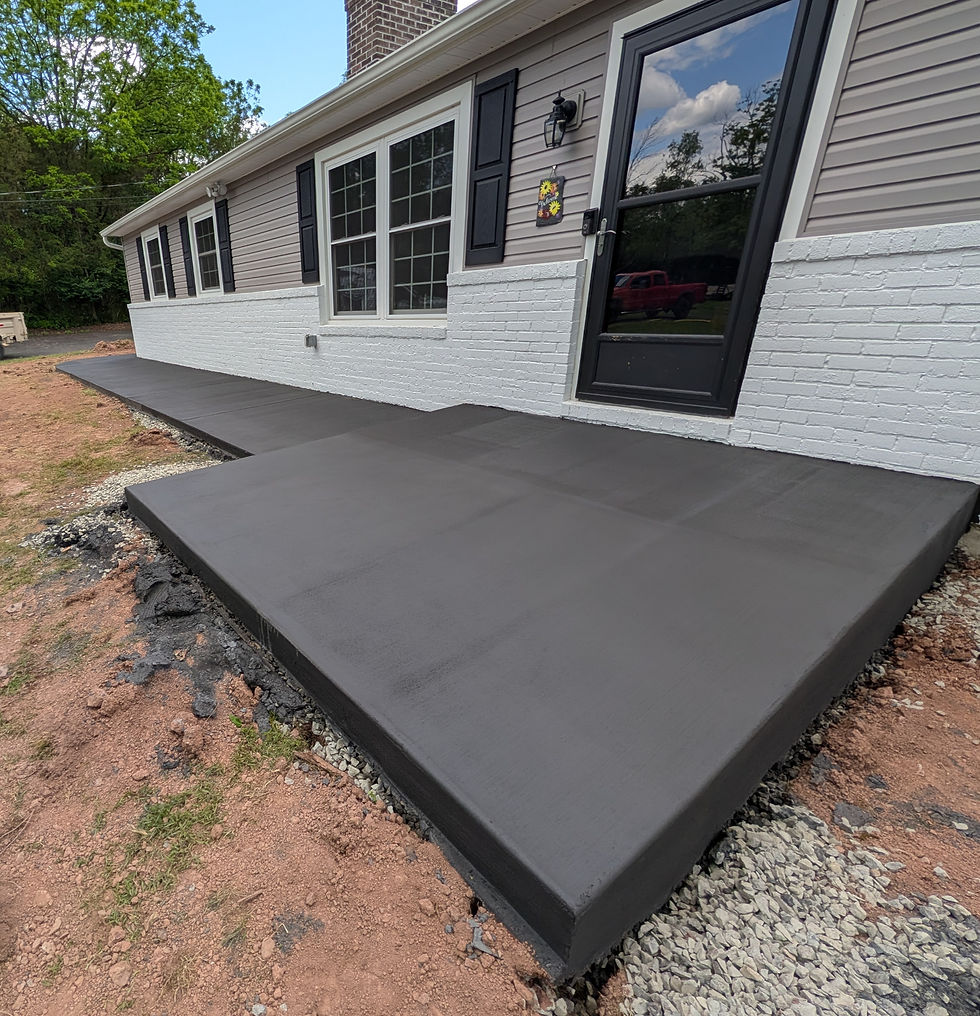
The homeowner selected SikaColor Integral Concrete Color in C-34 Dark Grey.
Unlike topical color products that are applied only to the surface, integral color is mixed directly into the concrete itself. This means the color extends throughout the slab rather than existing as a coating on top.
One thing many homeowners don't realize is that colored concrete changes significantly during the curing process.
During the first several weeks, moisture trapped within the slab gradually evaporates, causing noticeable color variation. It is completely normal for the concrete to appear lighter, darker, blotchy, or inconsistent during this period. Over approximately 30 days, the color continues to mature and develop as the concrete reaches its final cured appearance.
The slab was finished with a broom texture to provide a clean appearance and slip-resistant surface.
Step 6: Water Spigot Relocation & Final Grading
To accommodate the new patio layout, the exterior water spigot was relocated from the front of the house to the side near the air conditioning unit. We also moved the Grounding rod from its original location so they it is next to the walkway instead of in the middle of it.
Once construction was complete, final grading adjustments were made around the patio and walkway to create smooth transitions into the surrounding lawn while encouraging positive drainage away from the home.
These finishing details help ensure the project performs as well as it looks.
The Finished Result

This project delivered far more than a new patio and walkway.
The completed improvements included:
New colored concrete patio
New concrete walkway
Wire-reinforced concrete construction
Underground downspout drainage
Foundation waterproofing
Water spigot relocation
Final grading improvements
Property protection during construction
Most importantly, the homeowners now have an outdoor space that is both attractive and designed to manage water properly for years to come.
What Homeowners Should Watch For

If you're considering a patio or walkway project, pay attention to more than just the concrete itself.
Look for:
Downspouts discharging beside the foundation
Water pooling near the house after storms
Damp basement walls
Existing drainage issues
Utility conflicts near the proposed project
Signs of settlement around existing concrete
The best exterior projects solve both visible and hidden problems at the same time.
Frequently Asked Questions
Why should downspouts be buried during a patio project?
Buried downspouts help carry roof runoff away from the foundation and surrounding concrete. This reduces erosion, helps prevent water intrusion, and protects the longevity of exterior improvements.
How long does colored concrete take to reach its final color?
Integral colored concrete often continues changing appearance for several weeks. Most color variations settle as the concrete cures and moisture gradually evaporates during the first 30 days.
Is foundation waterproofing worth doing when installing a patio?
Often, yes. If excavation equipment is already onsite and access to the foundation is available, combining the projects is typically more efficient and cost-effective than completing waterproofing separately later.
Related Blog Posts

The small details that helped make this project successful, from driveway protection to waterproofing.
Learn how pump trailers, smaller trucks, and ground protection mats helped avoid costly driveway damage.
Why We Buried the Downspouts Instead of Leaving Them Above Ground
A closer look at how underground drainage helps protect foundations, patios, and landscaping.
Foundation Waterproofing: Protecting a Finished Basement from Water Damage
See how foundation waterproofing and proper drainage work together to keep moisture out.
A Comprehensive Overview
See the improvements to this property through a series of before and after images and descriptions.
Areas We Serve

K+L Construction provides concrete patios, walkways, foundation waterproofing, drainage solutions, excavation, grading, septic services, and site preparation throughout Berks County and the surrounding region, including Boyertown, Bally, Fleetwood, Kutztown, Oley, Topton, Bechtelsville, Reading, Pottstown, Quakertown, and neighboring communities throughout Southeastern Pennsylvania.
Ready to Upgrade Your Outdoor Space?

Whether you're planning a patio, walkway, drainage improvement, or foundation waterproofing project, we'd be happy to help you create a solution that looks great and performs for years to come.


Comments