
Horse Dry Lot Installation: Creating a Mud-Free Turnout Area in Berks County, PA
- Laura Nelson
- Jun 11
- 5 min read

Project Snapshot
Project Type: Horse Dry Lot Construction
Location: Bernville, Berks County, PA
Problem: Persistent mud and standing water around a horse barn, creating unsafe and unhealthy conditions for horses.
Solution: Excavation, stabilization fabric installation, drainage layers using 2B clean stone, screenings footing, and integration with a larger drainage and grading plan.
Why This Horse Property Needed a Dry Lot

One of the biggest challenges horse owners face is mud.
This property had plenty of it.
For the homeowner, the goal was to safely bring horses home to the property. Before that could happen, the turnout area needed to provide stable footing regardless of weather conditions.
The barn was located at the bottom of two steep hills where water naturally collected during rainstorms. Years of runoff and poor drainage had created muddy conditions around the barn that made the area difficult to use and maintain.
A properly designed dry lot helps eliminate those issues while creating a cleaner, safer, and more functional environment.
Why Mud Is a Problem for Horses
Mud is more than an inconvenience. While many people assume mud is simply part of horse ownership, excessive mud can create serious problems for both horses and property owners.
Extended exposure to wet, muddy conditions can contribute to:
Thrush and other hoof infections
Scratches and skin irritation
Increased risk of slipping and injury
Difficulty rehabbing injured horses
Increased maintenance and cleanup
Damage to paddocks and turnout areas
Horse owners know that horses are incredibly talented at finding ways to injure themselves without any assistance. Poor footing only increases those risks.
Creating a stable turnout area helps protect both horses and property.
What Is a Dry Lot?
A dry lot is a specially constructed turnout area designed to remain usable during wet weather conditions.
Unlike a traditional paddock, a dry lot is built using engineered layers that allow water to drain away while providing a comfortable surface for horses.
When designed properly, a dry lot can:
Reduce mud
Improve drainage
Protect horse health
Create safer footing
Simplify manure management
Extend the usable area of a property throughout the year
Many horse owners also use dry lots as rehabilitation areas, sacrifice lots, feeding areas, or multi-purpose turnout spaces.
Step 1: Excavation and Site Preparation

Every successful dry lot starts with proper preparation.
We began by removing the existing topsoil and establishing the a flat area across the project area. This step is critical because no amount of stone can compensate for poor base preparation.
The goal is to create a stable foundation while maintaining positive drainage throughout the finished area.
Just like building a house starts with a strong foundation, a long-lasting dry lot starts with proper site preparation.
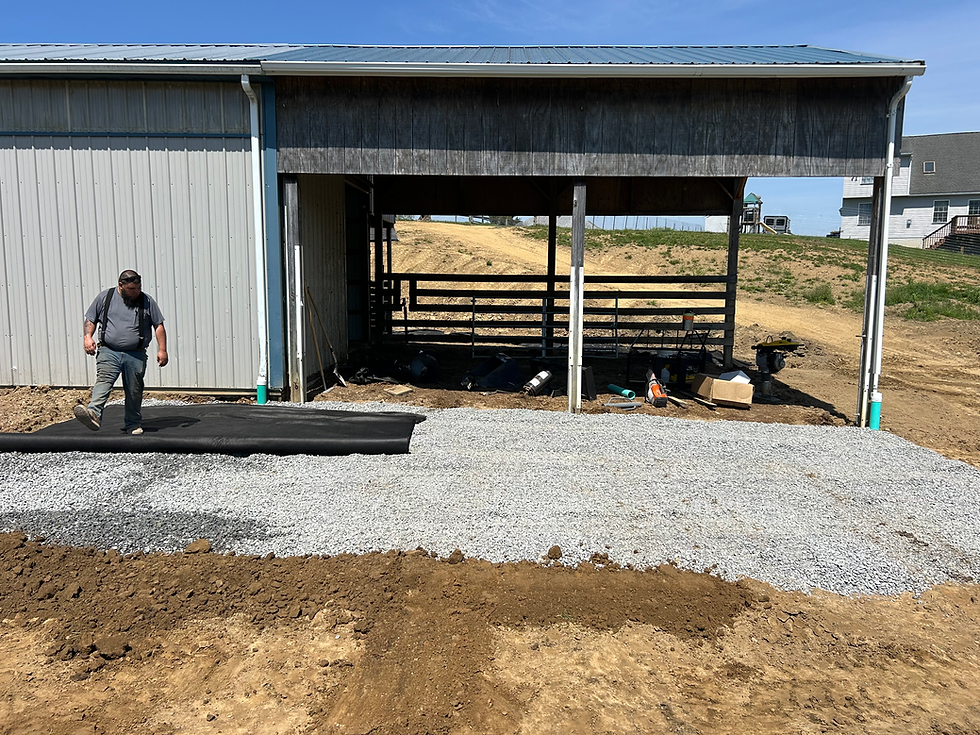
Step 2: Installing the Stabilization Fabric
Once the area was excavated and graded, we installed woven geotextile fabric directly over the prepared soil.
This woven fabric is extremely strong and commonly used beneath driveways and other load-bearing surfaces.
Its primary purpose is to prevent the stone layers above from sinking into the soil below. Without this stabilization layer, the stone can gradually disappear into the ground over time, reducing both performance and lifespan.
The woven fabric creates a durable separation layer that helps maintain the integrity of the entire system.
Step 3: Installing the Drainage Layer
Next, we installed 4 inches of 2B clean stone. This layer is the heart of the drainage system.
Unlike compacted aggregate, 2B clean stone contains open spaces between the stones that allow water to move freely through the layer.
As rainfall or runoff enters the surface, the water can quickly drain downward instead of remaining on top and creating mud.
This drainage layer works together with the grading and French drain systems installed elsewhere on the property to manage water effectively.
Step 4: Separating the Stone Layers
After the drainage layer was completed, we installed a second layer of non-woven geotextile fabric.
This fabric serves an important purpose. It prevents the screenings from mixing with the underlying 2B clean stone while still allowing water to
pass through the system.
Maintaining separation between these materials helps preserve drainage performance and prevents the surface layer from disappearing into the drainage layer below.
Step 5: Installing the Final Footing Surface
For the finished surface, we installed 4 inches of screenings.
We intentionally use a thicker layer because screenings naturally compact over time, especially in areas where horses frequently stand, walk, or congregate.
The finished surface provides:
Comfortable footing
Good traction
Easy maintenance
Improved durability
Protection for the fabric layers below
Unlike larger stone, screenings create a surface that is much more comfortable for horses while remaining durable enough for daily use.
Why We Don't Leave Horses Standing on Stone
One question we occasionally hear is:
"Why not just stop at the stone layer?"
While 2B clean stone is excellent for drainage, it is not ideal as a finished horse surface.
The larger stone can create pressure points on hooves and increase the likelihood of stone bruises or abscesses.
By adding fabric separation and screenings above the stone layer, we create a surface that remains horse-friendly while still benefiting from the drainage capabilities below.
The Finished Result

The completed dry lot now provides the homeowner with a durable, well-drained turnout area designed specifically for horse use.
Combined with the property's grading improvements and French drain installation, the area is now prepared to handle rain events that previously created significant mud and standing water.
The finished space offers:
Improved drainage
Reduced mud
Safer footing
Easier maintenance
Better conditions for horse health
Long-term performance
With proper cleaning and routine maintenance, a dry lot constructed using this method can provide years of reliable service.
Can Dry Lots Serve Multiple Purposes?
Absolutely.
Many horse owners use dry lots for more than just turnout.
Depending on size and layout, dry lots can function as:
Feeding areas
Rehabilitation spaces
Sacrifice lots
Winter turnout areas
Riding spaces for small properties
For horse owners with limited acreage, creating multi-use areas can be a smart way to maximize available space.
Frequently Asked Questions
How thick should a horse dry lot be?
Every site is different, but this project included 4 inches of 2B clean stone and 4 inches of screenings above a geotextile fabric system. Proper thickness depends on soil conditions, drainage needs, and intended use. We prefer a minimum of 4'' of surface because we know the horses will compact it over time, and without enough surface the geotextile fabric can come through in spots.
What is the best footing for a horse dry lot?
Many horse owners prefer screenings because they provide comfortable footing, compact well, and remain easy to maintain when paired with a properly designed drainage system beneath them.
How long does a dry lot last?
When properly constructed and maintained, a dry lot can last for many years. Routine manure removal, drainage maintenance, and occasional surface touch-ups can help maximize longevity.
Related Blogs
Areas We Serve

K+L Construction provides horse property improvements, dry lot construction, excavation, grading, drainage solutions, septic services, and site preparation throughout Berks County and the surrounding region, including Boyertown, Bally, Fleetwood, Kutztown, Oley, Topton, Bechtelsville, Reading, Pottstown, Quakertown, and neighboring communities throughout Southeastern Pennsylvania.
Ready to Improve Your Horse Property?

Whether you're dealing with mud, standing water, poor drainage, or need a properly constructed dry lot for your horses, we'd be happy to discuss solutions for your property.


Comments